Two days. That’s all it takes to give your garden a watering upgrade it will thank you for in every season. With hosepipe bans looming and summers getting stingier with rain, switching to a smart irrigation system isn’t just savvy — it’s essential. In this guide, we’ll walk through everything you need to plan, purchase, and install a drip irrigation setup over a single weekend. This system can transform thirsty beds into thriving plants while saving both time and money.
No jargon. No fuss. Just smart planning, a few key parts, and a bit of elbow grease to have your irrigation system humming before Monday.
Why Choose a Drip Irrigation System?
Here’s the simple truth: traditional sprinklers waste water. They spray broadly into warm air where wind and sun claim up to 50% before it even hits the soil. A drip irrigation system, on the other hand, delivers water directly to the base of each plant — slow and steady. Less evaporation, less runoff, and more hydration where it actually counts.
Drip lines also pass the UK’s hosepipe ban tests. Unlike hose-fed sprinklers, lines are allowed under current restrictions (with pressure-regulated emitters). That means you can keep watering legally during droughts with this irrigation system.
And here’s the kicker: by targeting the root zone, the setup promotes deeper root growth and discourages weeds. No soggy surfaces, no wasted effort — just healthy roots sipping on precisely what they need.
What You’ll Need (With Budget Options)
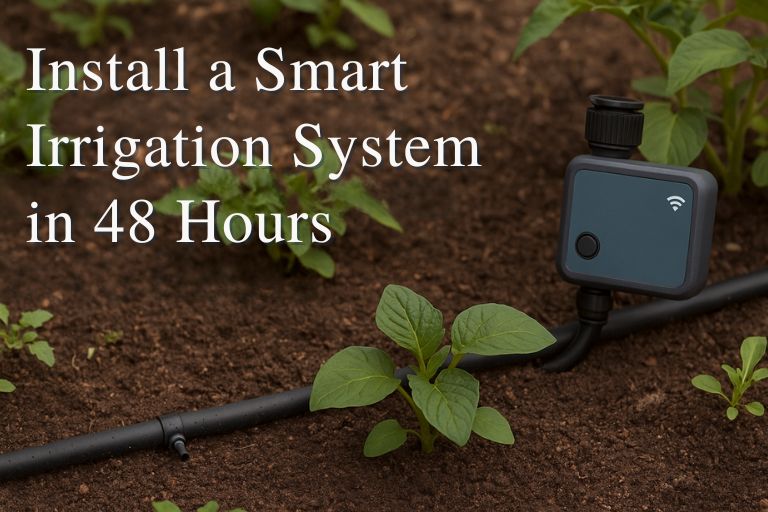
Main tubing: 16mm polyethylene, UV-stabilised, at least 25 psi rated. Budget rolls start at £25.
Pressure reducer: Required to keep emitters safe. Budget models like Orbit work fine; Rain Bird is top-end.
Emitters: Choose by plant type. Veggies? 0.5 gph. Trees or hedges? 1-2 gph. Get at least 100.
Barbed fittings: Tees, elbows, and end stops. Handy multi-packs are available on Amazon.
Wi-Fi hose timer: Orbit B-Hyve for budget, Rachio for premium. Expect to pay £70-£399.
Filter: 150-mesh inline, essential for preventing clogs.
Hole punch & pipe cutter: Often included in starter kits, but worth upgrading to stainless if you’re planning repeat use.
Total cost? Expect around £135 for budget kits, up to £260 for premium-grade gear.
Plan Like a Pro: Mapping Your Garden
Start with a map of your garden. Identify which plants are water-hungry (think tomatoes, cucumbers), and which are drought-tolerant (lavender, rosemary). Group them into zones.
Each zone should have its own timing schedule. Why? Because overwatering your succulents while trying to save your spinach is a recipe for rot and defeats the efficiency of this irrigation system.
Spacing matters, too. In loamy soil, place emitters 30-40 cm apart. Sandy soil? Go tighter. Clay? Space them out. Always avoid placing emitters right at the base of stems to ensure the water goes where needed.
Leave a bit of slack in your lines and add a flush cap at the lowest point. Trust us, you’ll want it when you rinse the setup.
Saturday: Hard Lines and Hardware
- Lay your tubing in the sun to soften so it’s pliable for installation.
- Attach your filter, pressure reducer, and smart timer to the outdoor tap to power everything.
- Cut your mainline and lay it along the garden beds, marking where each emitter will go.
- Insert tees and elbows where needed. Plug open ends for now — you’ll finish tomorrow.
Tip: Hand-tighten all fittings. Pliers can crack plastic threads and create leaks.
Sunday: Emitters, Flush & Program
- Use the hole punch to place emitters about 15 cm from plant bases so each plant gets its water spot.
- Run water through the lines for 5 minutes with the end caps open to flush out debris.
- Close the caps and check for leaks — even a single drip outside the emitter means wasted water.
- Set up your app: connect your timer, enable rain-skip and freeze-skip features to keep the system smart and efficient.
- Create seasonal schedules:
- Summer: run three times a week at dawn.
- Spring/Autumn: twice is enough for most gardens.
- Holiday mode: let the system run but send alerts if it skips three runs, so someone can check filters.
Mulch your beds after installation — you’ll reduce run times by 30-40% and keep roots cool.
Longer-Term Wins
A well-maintained drip setup lasts for years. In frost zones, drain lines so you don’t crack tubing over winter. A soil moisture sensor can turn it off when moisture hits 35%, making your irrigation system even smarter.
Track run minutes and skipped cycles via the timer app. You’ll see how much water you really save. Some users report cutting water use by 50% after fine-tuning.
Share-Worthy Project: Pinterest-Ready Ideas
Want to share your success? Lay out all your parts on a deck and snap a “Parts to Plants” flat-lay. Or set your phone to timelapse and capture that first misty dawn run.
Smart gardens aren’t just for the experts. With a well-planned irrigation system, a few tools, and two focused days, your garden can go from thirsty to thriving. And you? You’ll have one less thing to worry about every dry spell.